[ Home ] [ 1st Visit ] [ Tandem Display ] [ Accessories ] [ Parts ] [ Close-Outs ] [ Ordering Info ] [ About Us ] [ Links ]
THESE ARE NO LONGER AVAILABLE.
WE CAN COME UP WITH 1 QUICK RELEASE KIT IF THAT IS NEEDED - $50
ARAI DRUM BRAKE INFO
The Arai brake is a cable operated drum type brake which threads onto the left side of a "tandem hub" designed for the application. Threaded tandem hubs are "standard equipment" on virtually all quality tandems with the exception of a couple of racing models.
![]() The
unit is rather simplistic in design and consists of a drum and backing plate to
which the shoes, return springs and actuation arm are mounted. The design is
strikingly similar to drum brakes used in automotive applications only
mechanically operated rather than hydraulic.
The
unit is rather simplistic in design and consists of a drum and backing plate to
which the shoes, return springs and actuation arm are mounted. The design is
strikingly similar to drum brakes used in automotive applications only
mechanically operated rather than hydraulic.
|
Arai Drum Brake Assembled |
Arai Drum Brake Disassembled |
|
|
|
![]() This
time tested reliable brake continues to be an affordable and effective way to
control speed on long descents seen in mountainous terrain.
This
time tested reliable brake continues to be an affordable and effective way to
control speed on long descents seen in mountainous terrain.
![]() The
main function of a drag brake is for speed control, something necessary to avoid
over-heating the rims which can lead to melted tubes, melted rim strips and tire
blow-off problems. One certainly does not want this to happen during a high
speed descent!
The
main function of a drag brake is for speed control, something necessary to avoid
over-heating the rims which can lead to melted tubes, melted rim strips and tire
blow-off problems. One certainly does not want this to happen during a high
speed descent!
![]() Generally
one sets the brake to control speed whereby the rim brakes can be briefly
actuated for changing road conditions. A secondary benefit to having a drag
brake is its function as a "parking brake" but it is hardly worth
lugging two pounds around just for that purpose.
Generally
one sets the brake to control speed whereby the rim brakes can be briefly
actuated for changing road conditions. A secondary benefit to having a drag
brake is its function as a "parking brake" but it is hardly worth
lugging two pounds around just for that purpose.
![]() The
brake is generally not used as a primary brake to stop a tandem but it is often
very useful as an assist brake when extra weight is involved such as on
triplets, quads, heavy teams, or loaded touring.
The
brake is generally not used as a primary brake to stop a tandem but it is often
very useful as an assist brake when extra weight is involved such as on
triplets, quads, heavy teams, or loaded touring.
INSTALLATION TIPS
![]() 1)
Coat the threads with grease or better yet, anti-seize compound (available at
any auto store). This is VERY important otherwise removal may be virtually
impossible at a later date.
1)
Coat the threads with grease or better yet, anti-seize compound (available at
any auto store). This is VERY important otherwise removal may be virtually
impossible at a later date.
![]() 2)
The left end of the axle will have a 2mm or so thick spacer which must be
removed along with an outer locknut or axle end depending upon the hub design.
It is usually best to remove this spacer before installing the drum onto the
hub. Shimano tandem hubs use a locknut, White Industries an axle end secured by
small Allen set screws and DT Hugi an axle end which simply slides into the
axle. Hadley and Phil Wood both have field serviceable designs where the axle
ends are removed via two 5mm Allen wrenches.
2)
The left end of the axle will have a 2mm or so thick spacer which must be
removed along with an outer locknut or axle end depending upon the hub design.
It is usually best to remove this spacer before installing the drum onto the
hub. Shimano tandem hubs use a locknut, White Industries an axle end secured by
small Allen set screws and DT Hugi an axle end which simply slides into the
axle. Hadley and Phil Wood both have field serviceable designs where the axle
ends are removed via two 5mm Allen wrenches.
![]() 3)
Carefully thread the drum onto the left side of the hub. It has a
"normal" right hand thread so turn the drum clockwise to
install/tighten. Don't confuse the right from the left on older freewheel style
hubs since they are threaded on both sides.
3)
Carefully thread the drum onto the left side of the hub. It has a
"normal" right hand thread so turn the drum clockwise to
install/tighten. Don't confuse the right from the left on older freewheel style
hubs since they are threaded on both sides.
![]() 4)
After tightening the drum snugly with your hands, use a rag and remove any extra
grease from the inside and outside of the drum. The heat generated from braking
will likely cause the grease to turn to oil thus contaminating the brake shoes
if you skip this step.
4)
After tightening the drum snugly with your hands, use a rag and remove any extra
grease from the inside and outside of the drum. The heat generated from braking
will likely cause the grease to turn to oil thus contaminating the brake shoes
if you skip this step.
![]() 5)
Slide the backing plate and brake shoe assembly over the axle so that the
backing plate replaces the spacer you removed earlier. If the hole in the
backing plate is too small for the axle, carefully drill or file it out to the
proper size. It is certainly best to retain the centering effect of the hole.
One can draw a larger circle around the hole to ensure uniform enlargement.
5)
Slide the backing plate and brake shoe assembly over the axle so that the
backing plate replaces the spacer you removed earlier. If the hole in the
backing plate is too small for the axle, carefully drill or file it out to the
proper size. It is certainly best to retain the centering effect of the hole.
One can draw a larger circle around the hole to ensure uniform enlargement.
![]() 6)
Thread or slide on the outer spacers, locknuts or axle ends but do not tighten
at this point. Next move and hold the actuation arm in the "brake on"
position while tightening the outer locknut or axle end. This step will help the
shoes center up by the tolerances available between the backing plate and the
axle. Please note that Hugi and White Industries use an axle end which does not
tighten against the backing plate so it is best to do this step as you secure
the wheel in the frame with the quick release.
6)
Thread or slide on the outer spacers, locknuts or axle ends but do not tighten
at this point. Next move and hold the actuation arm in the "brake on"
position while tightening the outer locknut or axle end. This step will help the
shoes center up by the tolerances available between the backing plate and the
axle. Please note that Hugi and White Industries use an axle end which does not
tighten against the backing plate so it is best to do this step as you secure
the wheel in the frame with the quick release.
![]() 7)
The reaction arm must be connected to the frame upon wheel installation. There
is usually a Pac Man type bracket or mount on the frame to accommodate this
need. The newer Santanas have a Hayes disc brake mount to which one must attach
the arm via an adapter available from your Santana dealer. If your frame does
not have provisions for a drum brake mount, you can secure the reaction arm with
a strap around the frame similar to that used on old coaster brake bikes.
7)
The reaction arm must be connected to the frame upon wheel installation. There
is usually a Pac Man type bracket or mount on the frame to accommodate this
need. The newer Santanas have a Hayes disc brake mount to which one must attach
the arm via an adapter available from your Santana dealer. If your frame does
not have provisions for a drum brake mount, you can secure the reaction arm with
a strap around the frame similar to that used on old coaster brake bikes.
|
Typical Pac Man Mount |
Hayes Type Disc Brake Mount |
Santana Hayes Mount Adapter |

|

|

|
![]() Most tandem frames manufactured in recent history are designed with clearance
to accommodate a drum brake. If your frame is equipped with the features
pictured above it is safe to assume that one will fit. That said, some frames
are not designed with the Arai drum brake in mind. Below is a drawing furnished
by a T@H regular which will simplify the process for you in determining whether
you have enough room for the brake.
Most tandem frames manufactured in recent history are designed with clearance
to accommodate a drum brake. If your frame is equipped with the features
pictured above it is safe to assume that one will fit. That said, some frames
are not designed with the Arai drum brake in mind. Below is a drawing furnished
by a T@H regular which will simplify the process for you in determining whether
you have enough room for the brake.
WILL THE ARAI DRUM BRAKE FIT MY TANDEM?
(Click to Enlarge)
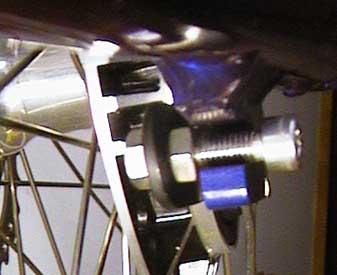
It is certainly worthwhile to purchase a quick release kit which allows you to disconnect the cable and reaction arm from the frame in the event of a flat tire without the use of tools. A 5mm x 25mm or 6mm X 25mm bolt secured to the reaction arm which nestles in the Pac Man hook prevents rotation during brake application. Please note that a 6mm bolt requires a very slight hole enlargement or in the alternative you may wish to run a tap through the hole. Sometimes the hook slot may not permit use of the shouldered bolt that comes with the q.r. kit thus double-nutting a 5mm or 6mm bolt may be required.
As pictured below, a 5mm bolt is secured to the arm by two nuts which when tightened together actually sandwich the arm.
|
Bolt Mounted to Reaction Arm |
Reaction Arm Bolt In The Hook |
Cable Quick Release Assembly |
|
|
|
|
We send a 6mm bolt with our kit along with a nylok nut. Force the 6mm bolt to thread through the hole in the reaction arm using a 3-way Allen wrench and then secure with the nylok nut behind the reaction arm. The reaction arm bolt pictured is a 5mm bolt requiring a nut on both the inside and outside of the arm.
ACTUATION METHODS
![]() There
are primarily three types of controls and positions commonly used to actuate the
Arai drum brake. First one must decide who should be in control, i.e., the
stoker or the captain.
There
are primarily three types of controls and positions commonly used to actuate the
Arai drum brake. First one must decide who should be in control, i.e., the
stoker or the captain.
![]() When
the stoker is in control of the hub brake, the team often has difficulty
communicating whether the brake is on too much, not enough or whether it should
be on at all. This is compounded by the wind noise associated with rapid
mountain descents. Under this scenario, the team could inadvertently lock up the
rear wheel resultant of too much braking with the captain and stoker being
unaware of how much braking effort the other is doing combined with the
possibility of adverse road conditions.
When
the stoker is in control of the hub brake, the team often has difficulty
communicating whether the brake is on too much, not enough or whether it should
be on at all. This is compounded by the wind noise associated with rapid
mountain descents. Under this scenario, the team could inadvertently lock up the
rear wheel resultant of too much braking with the captain and stoker being
unaware of how much braking effort the other is doing combined with the
possibility of adverse road conditions.
![]() After
hearing first hand of these problems and for safety's sake, I now recommend the
captain be in control of ALL of the brakes.
After
hearing first hand of these problems and for safety's sake, I now recommend the
captain be in control of ALL of the brakes.
![]() The
captain can control the Arai drum brake by:
The
captain can control the Arai drum brake by:
![]() 1)
Using a Bar End shifter if STI or Ergo levers are in use.
1)
Using a Bar End shifter if STI or Ergo levers are in use.
![]() 2)
Using an inexpensive Thumb Shifter when either Bar End shifters, STI or Ergo are
in use.
2)
Using an inexpensive Thumb Shifter when either Bar End shifters, STI or Ergo are
in use.
![]() 3)
Designating one brake lever for the hub brake and operating both rim brakes via
one lever. This can be accomplished with the Dia Compe 287 lever designed for two brakes
or via a cable wishbone or wishbone type adapter. I don't really favor this scenario as I
strongly prefer to have the rim brakes operate independently of each other,
especially should an emergency situation arise. Use of the Bar End or
Thumb Shifter options permit
being able to control the rim brakes individually.
3)
Designating one brake lever for the hub brake and operating both rim brakes via
one lever. This can be accomplished with the Dia Compe 287 lever designed for two brakes
or via a cable wishbone or wishbone type adapter. I don't really favor this scenario as I
strongly prefer to have the rim brakes operate independently of each other,
especially should an emergency situation arise. Use of the Bar End or
Thumb Shifter options permit
being able to control the rim brakes individually.
Deciding which control method is a personal preference issue. It is easy to recommend using a thumb control mounted on top of the bar if you spend most of your time riding with your hands in that proximity. Those that ride in the drops a great deal would likely appreciate the bar end shifter.
DRUM REMOVAL
![]() Sometimes
removal of the drum can be done successfully by rolling the bike backwards while
applying extreme braking pressure while someone sits on the stoker saddle. Most
commonly the unit is loosened via a large spanner wrench designed for the purpose after
removing the backing plate and turning the drum counter clockwise.
Sometimes
removal of the drum can be done successfully by rolling the bike backwards while
applying extreme braking pressure while someone sits on the stoker saddle. Most
commonly the unit is loosened via a large spanner wrench designed for the purpose after
removing the backing plate and turning the drum counter clockwise.
![]() You
will notice in the disassembled picture above that a very large nut is designed
on the interior surface. A very large socket, 41mm or 1 9/16" is required.
One can use a tool of this magnitude and certainly get the job done or one can purchase a spanner type wrench
which is the easiest option. It is also possible
to make a tool.
You
will notice in the disassembled picture above that a very large nut is designed
on the interior surface. A very large socket, 41mm or 1 9/16" is required.
One can use a tool of this magnitude and certainly get the job done or one can purchase a spanner type wrench
which is the easiest option. It is also possible
to make a tool.
CABLE ROUTING
![]() The
various tandem manufacturers have different philosophies about how to route
cables and who should control the drag brake. Santana and Meridian have a cable
stop on the down tube used for captain control. Co-Motion uses a cable stop
affixed to the lateral tube in the stoker compartment, primarily for stoker
control. Newer Co-Motions come with stops for either captain or stoker control.
If you have an older Co-Motion with a stoker cable housing stop only and desire
to have the brake be controlled by the captain, simply run a long housing down the lateral tube and use zip ties to affix
the housing to the frame tube.
The
various tandem manufacturers have different philosophies about how to route
cables and who should control the drag brake. Santana and Meridian have a cable
stop on the down tube used for captain control. Co-Motion uses a cable stop
affixed to the lateral tube in the stoker compartment, primarily for stoker
control. Newer Co-Motions come with stops for either captain or stoker control.
If you have an older Co-Motion with a stoker cable housing stop only and desire
to have the brake be controlled by the captain, simply run a long housing down the lateral tube and use zip ties to affix
the housing to the frame tube.
MAINTENANCE
![]() Arai
brakes require very little maintenance and they last a LONG time. If by chance
you wear out a pair of brake shoes, they are available as an assembled backing plate
assembly with shoes, springs and the backing plate. It is really best to replace the
entire backing plate module if a
problem such surfaces such as the brake failing to release. Wear takes place at the
cam, the brake shoe lining and the brake shoe cam surface, all of which add up
to a sticking problem after usually years of use.
Arai
brakes require very little maintenance and they last a LONG time. If by chance
you wear out a pair of brake shoes, they are available as an assembled backing plate
assembly with shoes, springs and the backing plate. It is really best to replace the
entire backing plate module if a
problem such surfaces such as the brake failing to release. Wear takes place at the
cam, the brake shoe lining and the brake shoe cam surface, all of which add up
to a sticking problem after usually years of use.
![]() If
braking power is less than normal, i.e., I view normal as being able to lock up
the rear wheel with drum brake application alone when no stoker is on the bike,
you can sometimes improve the friction relationship by sanding the brake shoes
and drum surface. Please realize you are dealing with an inhalant hazard and I
have no idea if asbestos is used in the lining compound but it would be best to
treat it as if that is the case.
If
braking power is less than normal, i.e., I view normal as being able to lock up
the rear wheel with drum brake application alone when no stoker is on the bike,
you can sometimes improve the friction relationship by sanding the brake shoes
and drum surface. Please realize you are dealing with an inhalant hazard and I
have no idea if asbestos is used in the lining compound but it would be best to
treat it as if that is the case.
![]()
To view these items in our Catalog, Click on "Parts" below, then "Brakes" after the Catalog loads, and scroll down to "Drum Brake".
The drum removal tool is found in the "Tool" section of our "Accessory" Catalog accessible via the link below.
[ Home ] [ 1st Visit ] [ Tandem Display ] [ Accessories ] [ Parts ] [ Close-Outs ] [ Ordering Info ] [ About Us ] [ Links ]